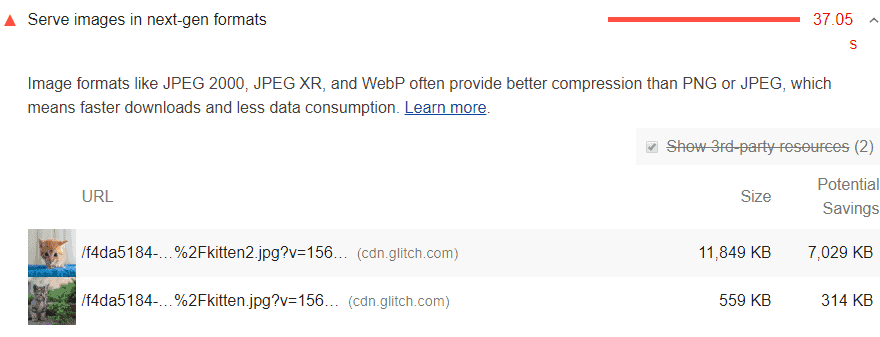
Do you know what type of format of photo or pictures Google accepts in this tech era? Do you ever feel that your so-called “optimized images” decrease your web page? If not, please test your website or a specific page on Page Speed Insights.
When you test your web page or web site, you’ll know how pictures make your site slow. But there is nothing to worry about it. Cause, I am going to tell you why.
First, Google’s web.dev wants those images, which are high quality but smaller file size. Second, photos which are load faster. And these two types match straight with WebP image format. So, it is to say that, WebP Serves in next-gen formats.
WebP is a format where you can find both high quality but small file size. Along with it’ll serve in fast loading. On top of that, it builds by Google.
Why you’ll learn:
Pictures format like jpg, jpeg, or png. But to run your web page or website fast, it using a small file size and low bandwidth. Let me give you a clear example to clarify the compared results between lossless and lossy compression format with jpeg or png:
According to WebP Compression Study:
- 25-34% smaller than a comparable JPEG.
- According to Google developers, Webp is 34% smaller than an equal PNG image.
- More than 80% reduce the file size while maintaining quality.
Now, a question may rise into your mind. And the question is, how lossless and lossy compression format manage these reductions in file size, right?
Well, Google’s WebP holds both lossy and lossless compression. Lossy WebP uses “predictive coding” to lower the file size based on VP8 key frame encoding.
And Lossless compression format uses a complex set of rules developed by the WebP team. For more info,please click this link!
When the images on a web page are about half the file’s size, small changes can give excellent results. That is why we will dive deeper into the matter.
So let’s learn how to add or use lossless and lossy compression format on WordPress.
Learn how to add or use WebP images on WordPress:
To add or use WebP images on WordPress, I have some handy and robust methods that are good to use. So, are you ready to learn these methods, then let’s start:
Method 01: Add WebP using the Plugin
The very first method to add WebP is to use the WordPress plugin. With those plugins, you can convert JPEG files to WebP to browse Chrome, Mozilla Firefox, and Opera. It also shows the JPEG files to browse with Safari and other browsers that don’t help lossless and lossy compression format.
So, do you want to know the name of the plugins? There are only a few great plugins, named by:
- WebP Express
- WebP Converter for Media
- ShortPixel
- Imagify
- Optimole
1. WebP Express:
It’s a popular WordPress plugin, comes to convert your JPEG, JPG, or PNG file into WebP format. But it’s built to reduce the image file size, fast loading, and provide a better user experience.
It also supports to change the situation. For example:
- By routing jpeg/png images to a similar webp.
- Replace image tags with picture tags by modifying the HTML templates .
- Replace image URLs by changing the HTML.
- Cache enabler combination.
- Deliver lossless and lossy compression format to all browsers and add the webpjs javascript.
On top of that, it’ll serve to better rank on Google, plus less bandwidth use. And above all, almost 88% of all traffic and 86% of mobile browsing traffic are with browsers propping webp.
On a serious note, Apache, Lite Speed, and Open Lite Speed server support WebP by default. But for the Nginx server, you’ve to write the below context in their block:
# WebP Express rules
# --------------------
location ~* ^/?wp-content/.*.(png|jpe?g)$ {
  add_header Vary Accept;
  expires 365d;
  if ($http_accept !~* "webp"){
    break;
  }
  try_files
    /wp-content/webp-express/webp-images/doc-root/$uri.webp
    $uri.webp
    /wp-content/plugins/webp-express/wod/webp-on-demand.php?xsource=x$request_filename&wp-content=wp-content
    ;
}

# Route requests for non-existing webps to the converter
location ~* ^/?wp-content/.*.(png|jpe?g).webp$ {
    try_files
      $uri
      /wp-content/plugins/webp-express/wod/webp-realizer.php?wp-content=wp-content
      ;
}
# ------------------- (WebP Express rules ends here)
2. WebP Converter for Media:
It’s also a WP plugin, comes to speed up your website by converting JPEG, PNG, and GIF format into WebP. So, you can reduce the page weight without losing quality for the fastest loading.
This plugin also supports various ways to improve your website’s fast loading. For example:
- Images convert and save in a separate directory.
- Converting image works for all pictures sizes.
- By default loading mode, it doesn’t change the image URL.
- You can change the image URLs using the mod_rewrite module on the server.
- If the .htaccess file block, a mode can loads images via PHP file.
When users want to download, they will not have to download much data. And at the same time server will be serving fast loading. So, you can call it a useful plugin both for the users and the server.
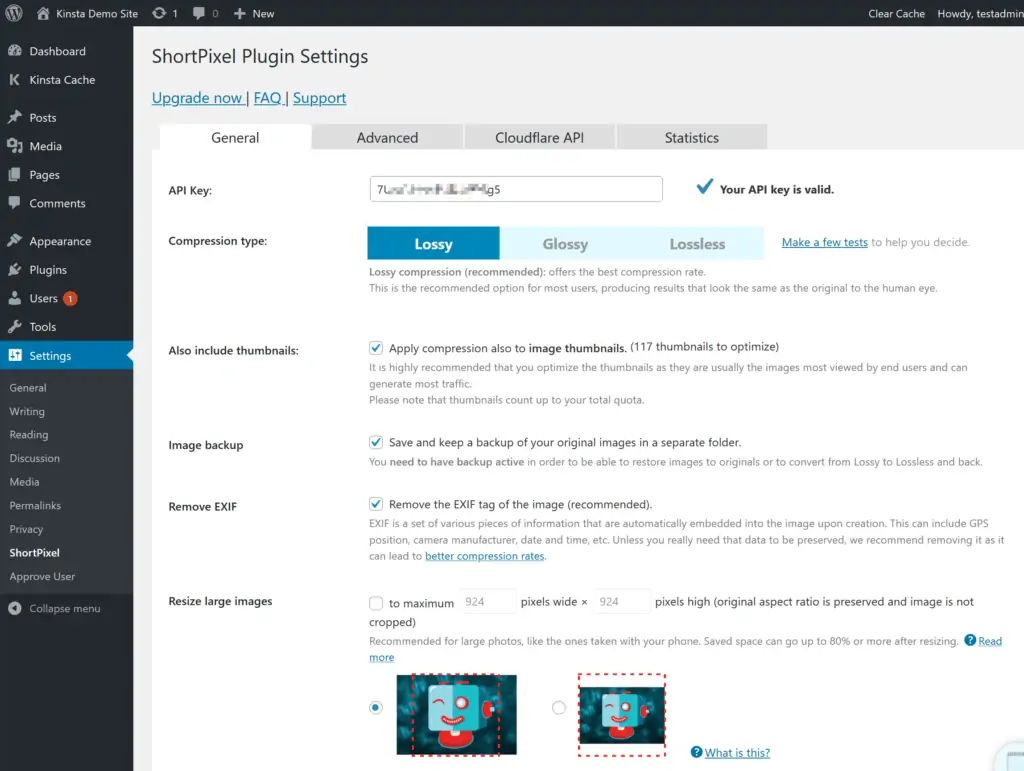
3. ShortPixel Image Optimizer:
It’s a WP plugin built to help picture resize and compress that uploaded to your WordPress site. It has both Free and Paid. In the Free plan, there is a limited plan for 100 images only to optimize per month. And in the Paid plan, up to 5,000 images per month starting at $4.99.
But, to serve lossless and lossy compression format through ShortPixel, install the plugin from WordPress.org. Afterward, connect your API key (API Key will get by registering on a free ShortPixel account).
After activated, you can use the General Settings box to select the compression level.
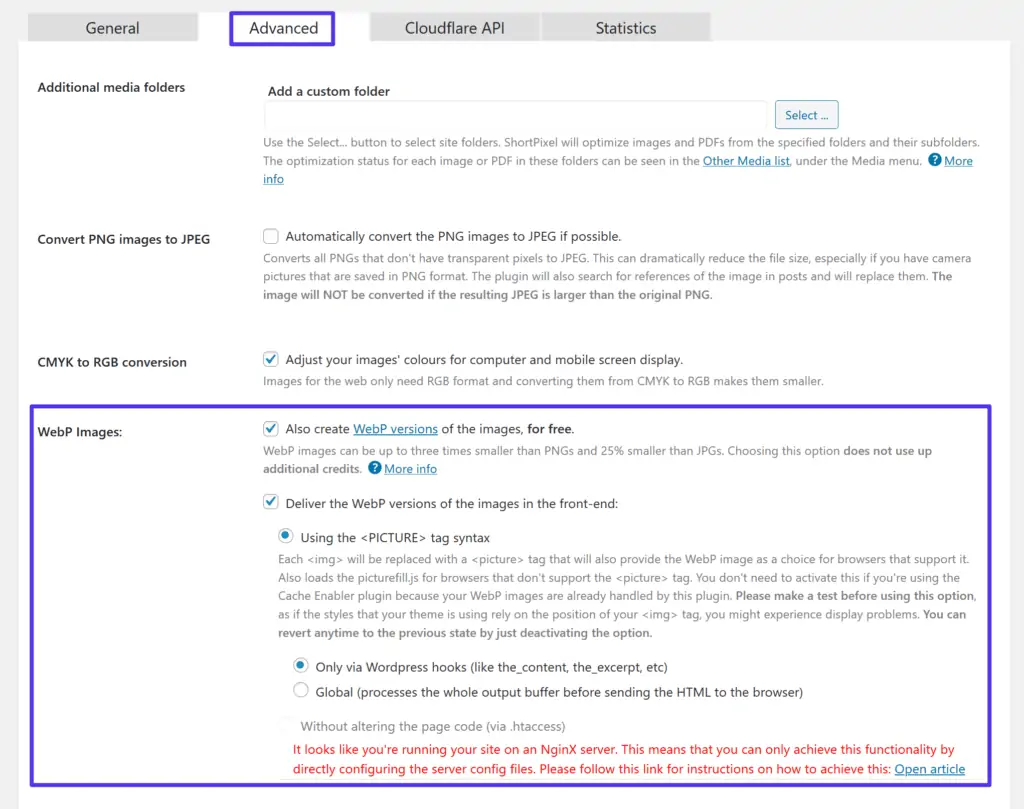
And to enable WebP, you need to navigate the Advanced tab, then:
- Look at the box for lossless and lossy compression format.
- Look at the box to Deliver the WebP versions (it’ll appear when you click the first box).
- Click the button for Using the tag syntax (it’ll appear when you click the previous box).
- And Finally, leave the default Only via WordPress hooks.
- Then, save the changes you make.
4. Imagify:
It’s a familiar and famous image compress and resizer built by WP Rocket. It resizes and compresses the picture upload to your WordPress site.
It has both Free and Paid. In the Free plan, there is a limited plan for 25 MB only to optimize per month. And in the Paid plan, up to 1 GB per month starting at $4.99.
But, to serve lossless and lossy compression format via Imagify, install the plugin from WordPress.org. Afterward, connect your API key.
After activated, you can use the General Settings box to select the compression level.
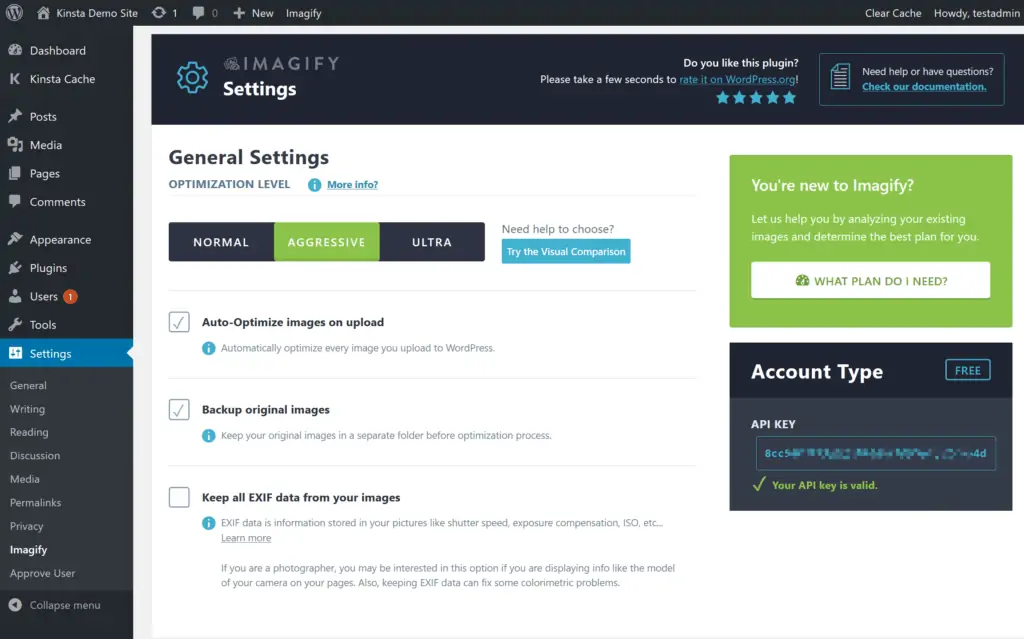
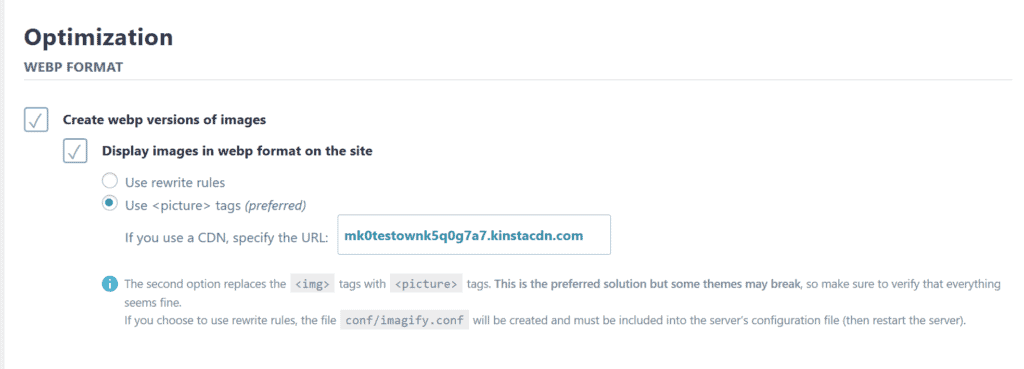
And to enable WebP images, you need to scroll down to the optimization section. Then look for the WebP Format section:
- Click the box of Create lossless and lossy compression format versions of photos/images.
- Click the box of Display pictures in lossless and lossy compression format.
- Click the button for Using the tag syntax.
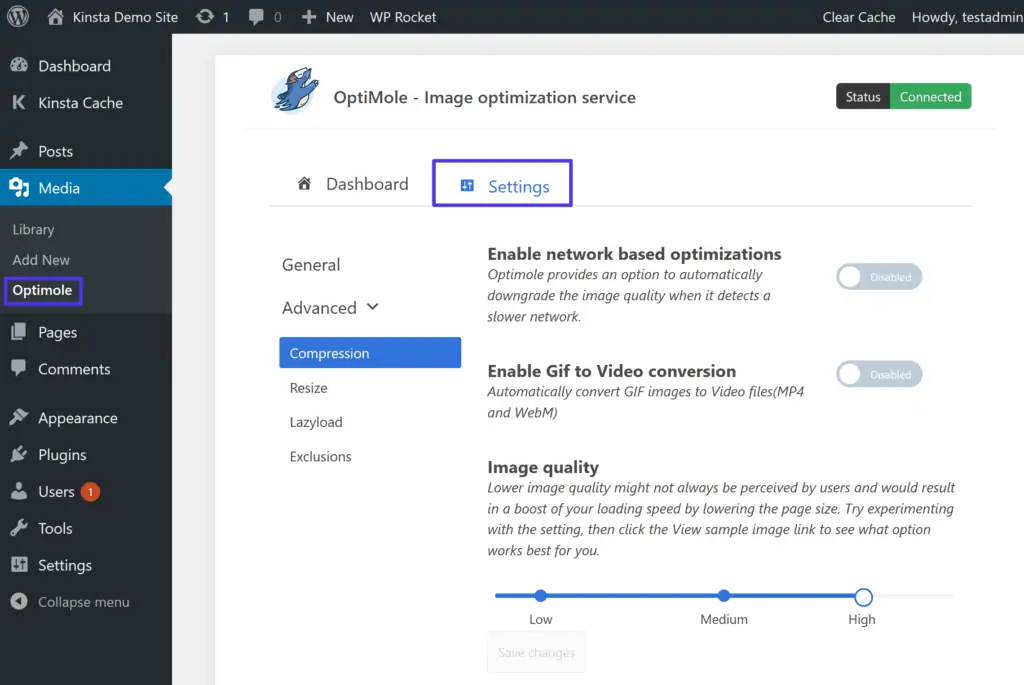
5. Optimole
It’s a little different WordPress image optimization plugin. It also resizes and compresses the picture upload to your WordPress site. But it adds two notable features, such,
- It serves images via its private CDN
- It gives real-time adaptive photos to deliver the optimal image for each visitor.
It has both Free and Paid. There is a limited plan to handle serving images of around 5,000 visitors per month in the Free program. And in the Paid plan, up to 25,000 visitors per month starting at $19.
So to start, first, install the plugin from WordPress.org. Second, connect your API key (API Key will get by registering on a free Optimole account).
After activated, it’ll start automatically optimizing your pictures via its CDN. There’s no need to enable it because Webp is on by default.
But to configure the other settings, go to Media → Optimole → Settings:
Method 02: Serve lossless and lossy compression format using CDN
It’s the best, plus the most painless way only to add WebP through CDN. As far as CDN is concern, you can found lots of CDN on the internet. But all they are not as good as useful.
That’s why I have come with three handy and useful CDN that is good to use. Such as:
- BunnyCDN
- Cloudflare with Polish (Pro plan)
- Cloudinary
1. bunny.net WordPress CDN:
It’s a next-gen WordPress CDN for fast performance. And it’s built for edge storage and optimization service. In a word, it comes with ‘Bunny Optimizer’ for compress and converts to WebP.
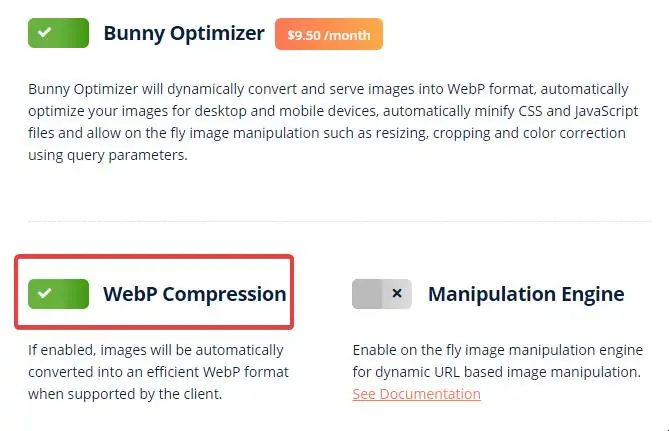
It has both Free and Paid. In the Free plan, you’ve to download it from the WordPress.org plugin. And you can also start a free 14 days trial version from here. After that, you can enable it on your WordPress site and enjoy it.
And in the Paid plan, up to 100 TB per month starting at Standard Tier $4.50 per month and Volume Tier $1.75 per month.
It includes some rich features, like:
- Restore static links with CDN links.
- Add or remove specific directories.
- Create custom CDN hostname.
- Automatic HTTPS configuration.
2.Cloudflare with Polish:
It’s a one-stop solution CDN for website holders or users. And it’s all about Security, Performance, and Reliability. Cloudflare with Polish is all about compress images. And polish strip metadata and applies lossy or lossless compression also.
It has both Free and Paid. In the Free plan, you’ve to download it from the Cloudflare WordPress Plugin. After that, you can enable it on your WordPress site and enjoy it.
And in the Paid plan, it’s starting at $20 per month. But to activate Cloudflare with Polish, you’ve to do the below working:
- First, go to the Cloudflare dashboard. Then check the Cloudflare account where you will activate Polish.
- Make sure your domain is select and click the Cloudflare Speed app.
- Afterward, scroll down to Polish.
- Now select lossy or lossless from the Polish dropdown menu.
- And at last click WebP.
3. Cloudinary:
It builds to automate your entire image management lifecycle. And it stores, transforms, and supply media with easy-to-use APIs or user interface. It also operates pictures with a URL-based API. And it also optimizes rich media through multi-CDN.
It has both Free and Paid. You’ve to sign it at the bottom from the Cloudinary official site or click here SIGN UP TO CLOUDINARY for a Free plan. After that, you can enable it on your WordPress site and enjoy it.
And in the Paid plan, 225k transformations or 225 GB of storage or bandwidth starting at $99 per month.
It includes some smart features, like:
- It improved performance through faster loading and good looking websites.
- It gives maximum productivity and activity with an excellent user experience.
- Enterprise-grade technology combines with your Tech Stack.
- Reduction in page weight and a boost in user engagement.
- A bright path for businesses to give amazing visuals at the range.
Method 03: Use the WebP in the Manual method
To use WebP manually, you’ve to do a few working. And the first step is:
Step One: Adding WebP format in HTML
To add webp format in HTML, you have to convert your pictures, including your previous image format. And to do this manually, I have come with an easy and short plan.
- Navigate to this website by clicking TinyIMG WebP converter for shopify store.
- Select and drop your images on dropbox.
- Your pictures will convert automatically. And after you finish converting, a download button will appear.
- Now download your photos.
- Afterward, edit the raw HTML code.
For example, your Image HTML code was like:
<img src="https://athemeart.com/wp-content/uploads//2021/09/webplogo.png" alt="athemeart" width="186" height="66" />
But now, you’re going to wrap the code with a little more HTML markup. Like:
<picture>

<source srcset="https://www.athemeart.net/wp-content/uploads/2016/09/webplogo.webp" type="image/webp" />

<img src="https://www.athemeart.net/wp-content/uploads/2016/09/webplogo.png" alt="gulshan kumar" width="186" height="66" />

</picture>
Step Two: Adding lossless and lossy compression format by Configure server settings
Bear in mind, those who use Apache, Light Speed, or Open Lite Speed server, you need to add the below code:
Serve Images with the correct Mime Type.
AddType image/webp .webp
Setup Cache
ExpiresActive On
ExpiresByType image/webp A2592000
But for the Nginx server, the code is a little bit different. That’s why you need to add the below code:
location ~ ^(/path/to/your/images.+).(jpe?g|png)$ {
 if ( $http_accept ~* webp ) {
 set $webp "A";
 }

 if ( $request_filename ~ (.+).(png|jpe?g)$ ) {
 set $file_without_ext $1;
 }

 if ( -f $file_without_ext.webp ) {
 set $webp "${webp}E";
 }

 if ( $webp = AE ) {
 add_header Vary Accept;
 rewrite ^(.+).(png|jpe?g)$ $1.webp break;
 }
}
And if WordPress does not support lossless and lossy compression format upload by default, then you need to add the below code:
    function webp_upload_mimes( $existing_mimes ) {
    // add webp to the list of mime types
    $existing_mimes['webp'] = 'image/webp';

    // return the array back to the function with our added mime type
    return $existing_mimes;
}
add_filter( 'mime_types', 'webp_upload_mimes' );
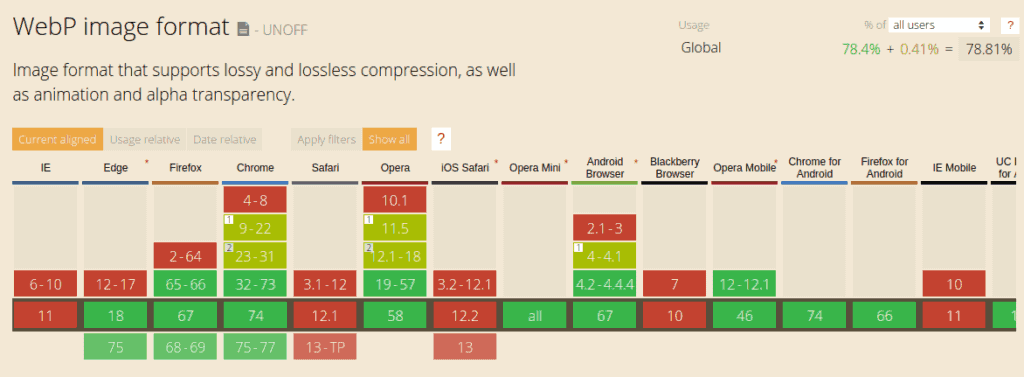
So, these are the methods you can use or serve to add WordPress WebP to your site. And on a serious note, WebP pic does not support all browsers.
Safari, iOS Safari, and outdated browsers don’t support lossless and lossy compression format. But still, 80% of devices support WebP. Below is an pictures to show you the differences and comparative results of WebP.
Wrapped Up:
WordPress WebP is an image format that is accepted by Google. And it’s the most useful image format to make your website rank higher in Google. Along with lossless and lossy compression format supports with SEO, performance, fast loading, and much more.
At last, I hope that this post will benefit you. And don’t forget to give your reviews, as those are important to us. And also hope you’ll stay connected with us for further interesting, engaging, and informative articles.