Want to add WooCommerce color and image swatches without touching a line of code? You can. In about five minutes you can replace the plain “Choose an option” dropdowns on your variable products with clickable color circles, photo thumbnails and size buttons, so shoppers see every choice at a glance and add to cart faster.
This ultimate guide walks you through the whole job, click by click, with real screenshots from a working store. You will install the plugin, create global product attributes, add colors and images to each term, assign them to a variable product, and fine-tune how your WooCommerce variation swatches look on product pages, shop pages and sidebar filters. We also cover the custom product attribute route for one-off products, so you can add image swatches to WooCommerce even when you have not created a global attribute.
Quick answer: Go to Products → Attributes, set the attribute Type to Color, Image or Button / Label, click Configure terms to pick a color or upload an image for each value, assign the attribute to a variable product, then fine-tune the look under Variation Swatches → Settings. That is the entire workflow.
This tutorial covers all settings and features of Smart Variation Swatches for WooCommerce—color, image, and label swatches, styling, tooltips, variations, and advanced options—to help you create a better shopping experience.
1. Introduction: Why Use Color and Image Swatches in WooCommerce?
Out of the box, WooCommerce shows every variable product option in a dropdown. It works, but it hides your best selling points. A shopper looking at a backpack has to open a menu, read the word “Olive”, and imagine what olive looks like. With WooCommerce color and image swatches, they simply see a green circle and tap it.
Before we touch a single setting, here is the end result so you know exactly what you are building. This is a real product page with color swatches, size buttons and brand image swatches replacing three dropdowns:
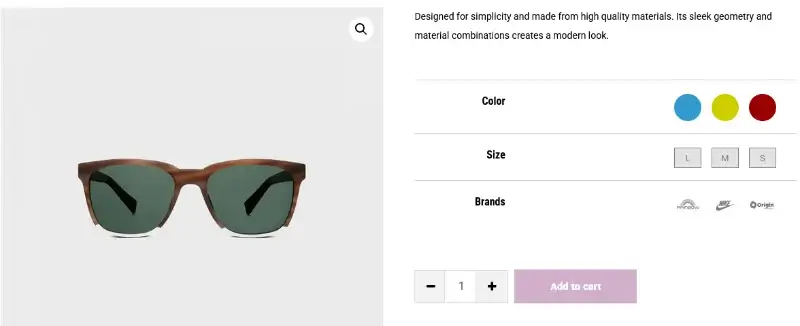
And here is the same idea on a shop page, where shoppers can compare options without opening each product:
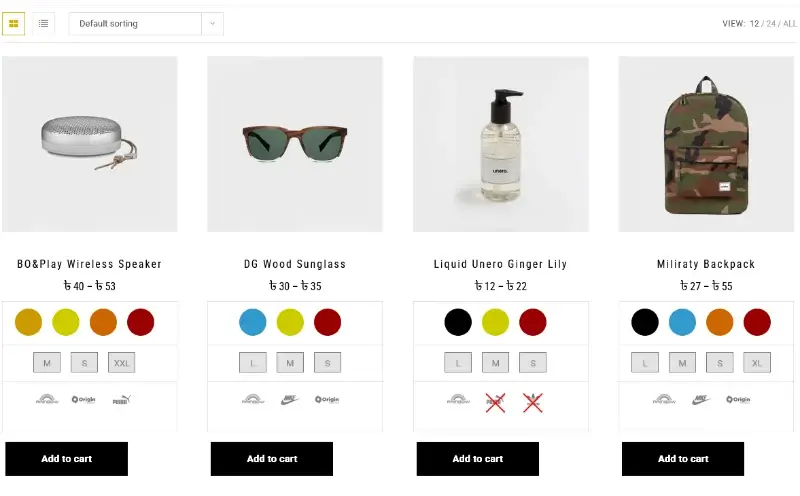
Why swatches beat dropdowns
Swatches are a small interface change, but they touch several parts of the buying journey:
- Visual products sell visually. Colors, patterns and finishes are easier to judge by looking than by reading a label.
- Fewer clicks. A dropdown needs a click to open and another to choose. A swatch needs one.
- Mobile friendly. Large tap targets are far easier to hit than a native select list on a small screen.
- All options visible. Shoppers immediately see what is available, and what is out of stock.
- Brand consistent. You control shape, size, borders and colors, so swatches match your theme.
- Works beyond the product page. With the right plugin, swatches also appear on shop pages and in sidebar filters.
| Feature | Default dropdown | Variation swatches |
|---|---|---|
| Seeing every option | Hidden until opened | Visible immediately |
| Clicks to choose | Two or more | One |
| Showing real colors or textures | Text only | Color fills and photo thumbnails |
| Out-of-stock feedback | Limited | Crossed out, faded, hidden or disabled |
| Shop and category pages | Not available | Available (Shop / Archive tab) |
| Look and feel | Theme default | Shape, size, border and colors you control |
If you are still comparing tools before you commit, our roundup of the best WooCommerce variation swatches plugins breaks down what each one offers. This tutorial uses Smart Variation Swatches for WooCommerce PRO from aThemeArt because it is built around global attributes, which makes the 5-minute setup possible.
2. What Are WooCommerce Variation Swatches?
WooCommerce variation swatches are visual selectors that replace the standard dropdown for variable products. Instead of choosing “Red” from a list, the shopper clicks a red circle. Instead of choosing “Cotton”, they click a button labeled Cotton. Behind the scenes nothing changes: WooCommerce still manages the same variations, prices, SKUs and stock. Swatches only change how the choice is presented.
Smart Variation Swatches supports six types: Color, Image, Button / Label, Radio, Checkbox and the native Select dropdown as a fallback. Three of them do most of the work in a real store.
Color Swatches
Color swatches are solid circles, squares or rounded squares filled with the color you choose. They are the fastest way to show options like Red, Navy or Sand, and each term gets its own color picker, so you can match your exact brand palette. Use them for any attribute where the shopper decides by looking at a single color.
Image Swatches
Image swatches show a small picture for each option. They shine when a single color cannot describe the choice: fabric patterns, wood finishes, tile textures, flavors with packaging, or brand logos. In the screenshot earlier, the “Brands” row is an image swatch attribute. If you have ever wanted to add image swatches to WooCommerce for patterns or logos, this is the type to use.
Label and Button Swatches
Label swatches (also called button swatches) display the term name inside a button. They are ideal for sizes (S, M, L, XL), materials (Cotton, Wool), storage capacities (64 GB, 128 GB) or pack counts. They are clean, accessible and need no images.
| Attribute | Best swatch type | Example terms |
|---|---|---|
| Color | Color | Red, Blue, Yellow, Black |
| Pattern or finish | Image | Striped, Oak, Marble |
| Brand | Image | Logo thumbnails |
| Size | Button / Label | S, M, L, XL |
| Material | Button / Label | Cotton, Wool, Leather |
| Features or add-ons | Checkbox or Radio | Gift wrap, Extended warranty |
3. What You’ll Need Before Getting Started
The setup is quick because there is very little to prepare. Tick off this list first:
- A WordPress site with WooCommerce installed and active (WooCommerce 8.0 or newer is required; the plugin has been tested up to WooCommerce 10.4 and WordPress 6.8).
- PHP 7.4 or higher and WordPress 6.0 or higher.
- Administrator access to your dashboard.
- The Smart Variation Swatches for WooCommerce PRO plugin zip file. If you buy it, download the zip from your confirmation email or from Purchase History in your aThemeArt account.
- Images for your image swatches (optional, only if you want pattern, texture or logo swatches). Square images work best.
- One variable product to test with, or five spare minutes to create one.
On a tight budget? A free version, Smart Variation Swatches on WordPress.org, covers the basic color, image and button swatches. The steps in this guide use the PRO version, which includes the shop / archive display options, the full Style tab and the sidebar swatch filter.
Attributes, terms and variations: a 30-second primer
If you are new to WooCommerce, three words come up constantly, and they are easy to mix up:
- Attribute: a type of choice, such as Color or Size.
- Term: one value of that attribute, such as Red or Large.
- Variation: one purchasable combination, such as Red + Large, with its own price, SKU and stock.
The Kinsta guide to WooCommerce variable products explains how to create product attributes and variations. In this tutorial, you create the attributes and terms once, and swatches take care of how they look.
4. How to Add Color and Image Swatches to WooCommerce in 5 Minutes
Here is the complete workflow. Each step has its own screenshot, and the whole thing takes about five minutes the first time (and well under a minute per extra attribute after that).
Step 1: Install and Activate Smart Variation Swatches
- In your WordPress dashboard, go to Plugins → Add New Plugin.
- Click Upload Plugin, then Choose File, and select
smart-variation-swatches-pro.zip. - Click Install Now, then Activate Plugin.
That is the same process as any other plugin. If you want a refresher, WordPress.org explains how to manage plugins, and aThemeArt’s installation documentation also covers the manual FTP method if your host blocks uploads.
After activation, a new Variation Swatches menu appears in your dashboard. Open it and you land on the Dashboard:
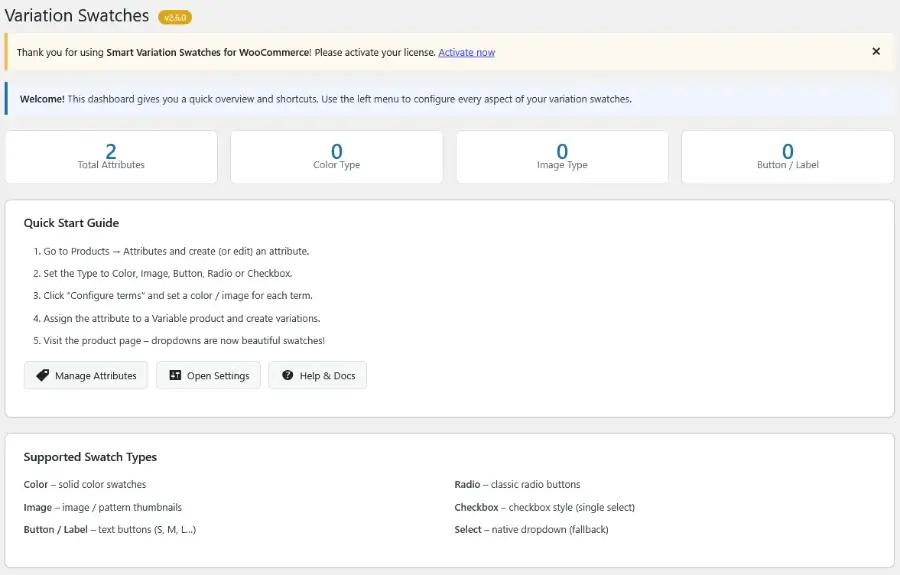
The dashboard shows how many attributes you have and how many already use the Color, Image or Button / Label type. A Quick Start Guide repeats the same five steps you are about to follow. If you see a notice asking you to activate your license, paste in your license key so the plugin can receive updates.
Optional but smart: open Variation Swatches → Settings → Swatch Types and switch on only the types you plan to use (Color, Image, Button / Label, Radio, Checkbox, Select). That keeps the attribute Type menu short and tidy.
Step 2: Create Global Product Attributes
Global attributes are the foundation of the 5-minute method. You create “Color” once, tell the plugin it is a color attribute, and every product that uses it automatically inherits the swatches.
- Go to Products → Attributes.
- Type a Name (for example, Color). WooCommerce fills in the slug for you.
- In the Type dropdown, choose Color. For sizes pick Button / Label, and for patterns or brands pick Image.
- Click Add attribute.
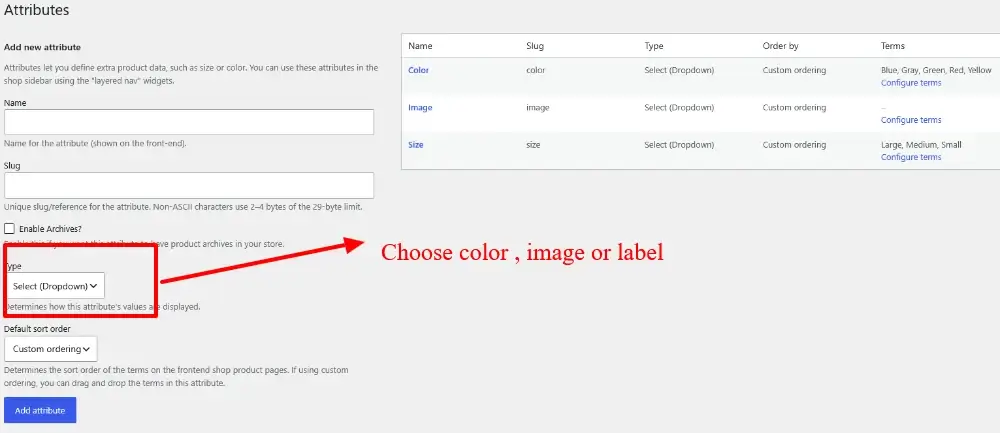
Repeat for each attribute you need. A typical clothing store creates three: Color (Color type), Size (Button / Label type) and optionally Pattern (Image type). WooCommerce’s guide to managing product taxonomies explains how attributes are stored if you are curious.
Tip: an attribute you already created before installing the plugin (for example, an existing “Color” attribute) does not need to be rebuilt. Just edit it and change its Type from “Select (Dropdown)” to the swatch type you want.
Step 3: Add Colors and Images to Attribute Terms
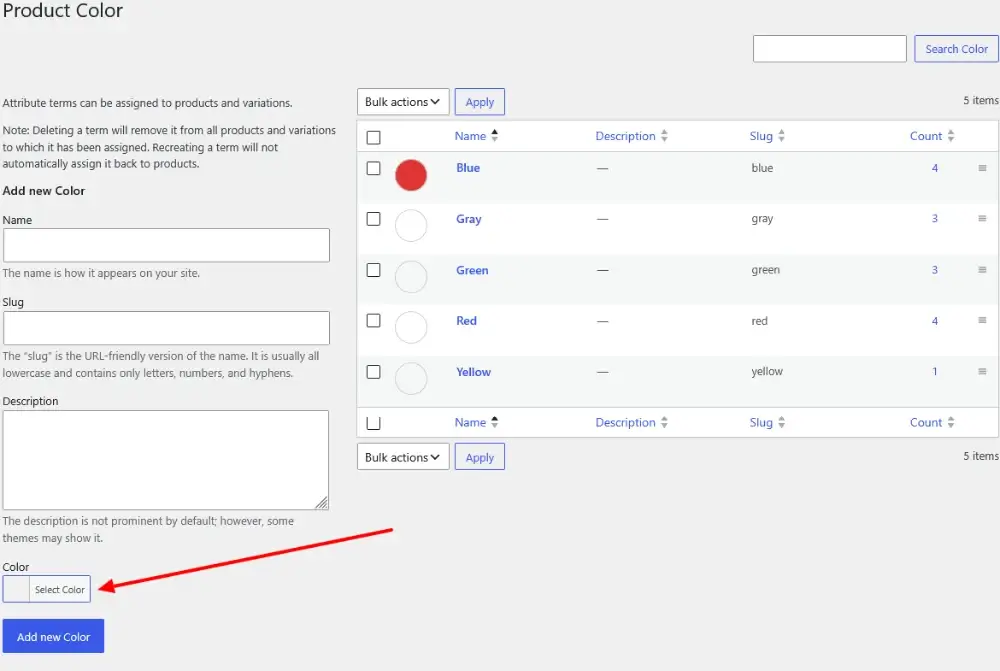
Now give each value its own color or picture. In the attributes table, click Configure terms under the attribute you just made. The plugin adds a swatch field to the standard “Add new term” form.
For a color attribute:
- Enter the term Name (for example, Red).
- Scroll to the Color field at the bottom of the form and click Select Color.
- Pick your color from the picker or paste a hex code, then click Add new Color.
For an image attribute:
- Enter the term Name (for example, Striped or Nike).
- In the Image field, click Upload/Add image and choose a picture from your Media Library.
- Click Add new Image. Use Remove image if you need to swap it later.
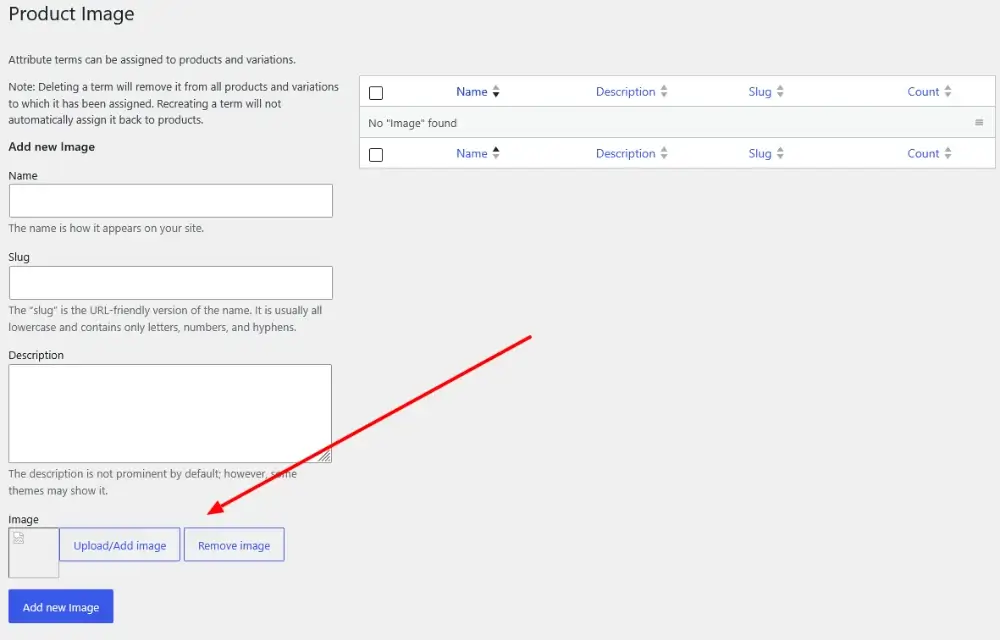
Image tips: use square images, keep the subject centered, and upload them at roughly double the swatch size (for example, 80 to 100 pixels for a 36 to 48 pixel swatch) so they stay sharp on high-density screens. Compress them before uploading; tiny files keep your pages fast.
Want the full reference for this screen? The aThemeArt documentation on configuring global attribute terms walks through every field.
Step 4: Assign Attributes to Variable Products
Your swatches exist, but they appear only on products that use the attribute. Open any product (Products → All Products → Add New or Edit) and follow this path:
- In Product data, choose Variable product.
- Open the Attributes tab, pick your global attribute (for example, Color) from the dropdown and click Add.
- Click Select all to include every term, or choose only the ones this product has.
- Tick Used for variations and click Save attributes.
- Repeat for Size, Brand or any other swatch attribute.
- Open the Variations tab, choose Generate variations and confirm.
- Set a price (and stock, if you manage it) for each variation, then click Save changes and Update.
Important: every variation needs a price. A variation without a price will not appear on the storefront, and that is the number one reason beginners think swatches are “missing”. If you need a deeper walkthrough of this screen, the WooCommerce variable product guide linked earlier covers it in detail.
Once the attribute is assigned, the product’s data panel also gets a swatches tab. When an attribute already has a global type, it simply reports that the product is using the global setting, and you do not have to configure anything.
Step 5: Configure Swatch Display Settings
The defaults already look good, so this step is about confirming a few options. Go to Variation Swatches → Settings. The page is organized into eight tabs:
| Tab | What it controls | Beginner recommendation |
|---|---|---|
| General | Global on/off switch, price update selector, clear-on-reselect, convert dropdowns to buttons | Leave Enable Swatches Globally on |
| Swatch Types | Which types appear in the attribute Type menu | Enable only what you use |
| Style | Shape, width, height, gap, border and button colors | Start with Circle, 36 px |
| Tooltip | Hover tooltip on or off, text and background colors | Keep tooltips on |
| Variations | Show attribute name, show selected value, hide original dropdown | Show the selected value and hide the dropdown |
| Availability | How out-of-stock swatches look, optional stock count in the tooltip | Crossed out is the clearest |
| Shop / Archive | Swatches on product loops (see section 6) | Enable once your product pages look right |
| Advanced | Custom CSS, disable on mobile, load scripts in footer | Leave as is |
Save changes, open a variable product on your storefront, and your dropdowns should now be swatches. That is the 5-minute setup done. Everything after this point is polish.
Bonus: Add Swatches to Custom Product Attributes
Sometimes you do not want a global attribute. Maybe one product has a unique option set that no other product shares. For that, WooCommerce lets you add a custom product attribute directly inside the product, and the plugin lets you give those values swatches too.
- Edit a variable product and open Attributes.
- Choose Custom product attribute, name it, and enter the values separated by a
|pipe character. - Tick Used for variations, save attributes, then generate and price your variations as in Step 4.
- Open the product’s Custom Swatches tab in the Product data panel.
- Choose the swatch type (for example, Image), then upload an image or pick a color for each term.
- Click Update.
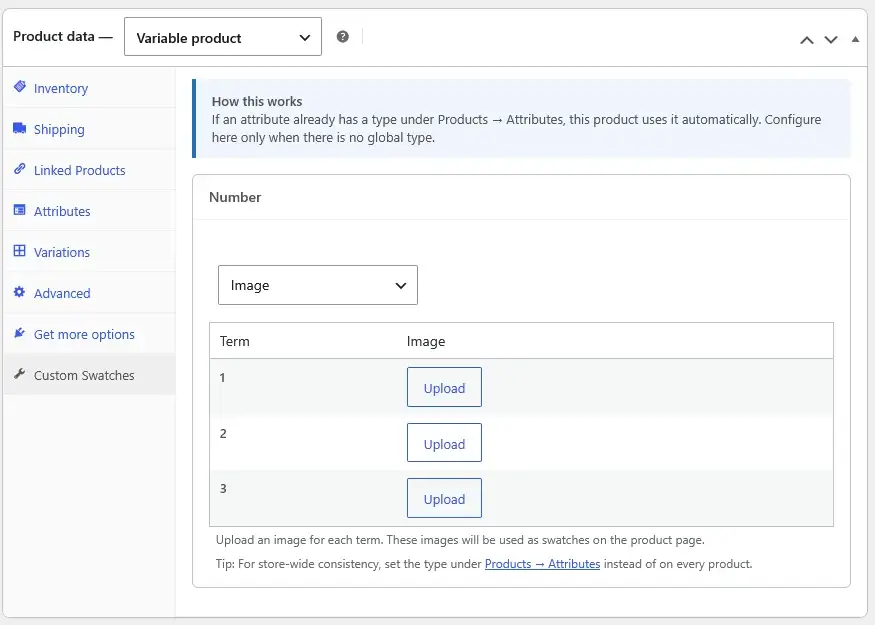
The tab itself explains the logic: if an attribute already has a type under Products → Attributes, the product uses it automatically, and you configure swatches here only when there is no global type.
| Global attribute | Custom product attribute | |
|---|---|---|
| Created in | Products → Attributes | Inside one product |
| Swatch setup | Once, applies to every product | Per product, per term |
| Best for | Stores with many products and shared options | Unique, one-off options |
| Sidebar filters and archives | Supported | Limited to the product |
| Maintenance | Change once, updates everywhere | Edit each product separately |
Our advice: use global attributes whenever you can. They are faster to maintain, they power the sidebar filter, and they keep your catalog consistent. If you want to go further and collect extra choices that are not variations (engraving text, gift messages, uploads), read our tutorial on WooCommerce product options and custom fields.
5. How to Customize WooCommerce Swatch Styles
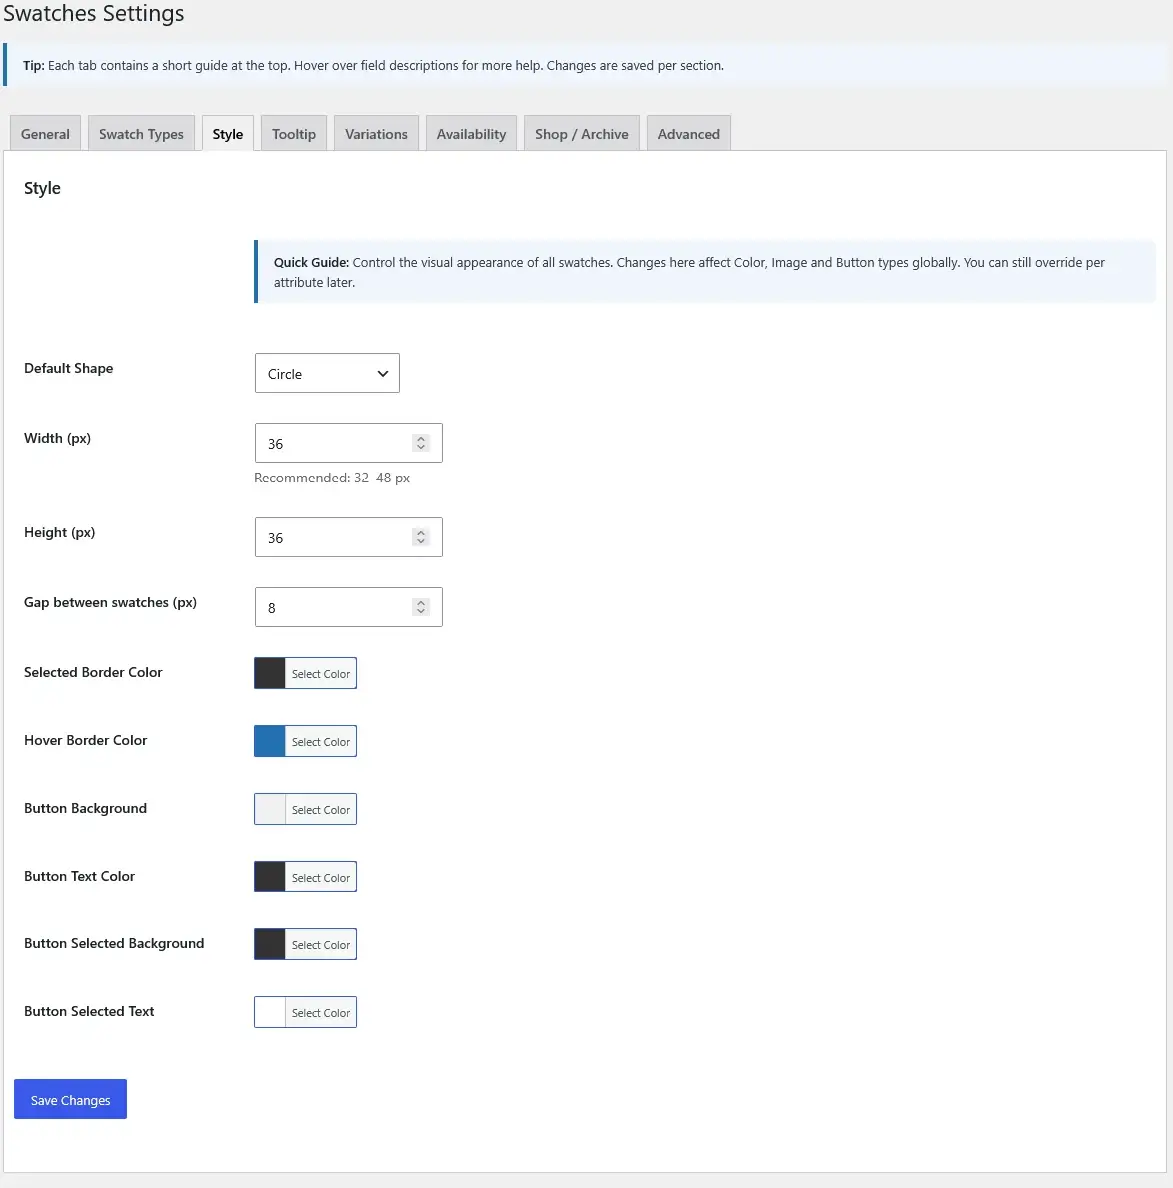
Out of the box the swatches are clean and neutral, but a few tweaks make them feel native to your brand. Everything lives under Variation Swatches → Settings → Style, and the changes apply to Color, Image and Button swatches across your store.
Circle, Square, and Rounded Styles
The Default Shape menu offers three choices: Circle, Square and Rounded Corners. There is no wrong answer, but each shape has a personality:
- Circle: friendly and familiar, the classic choice for color swatches.
- Rounded Corners: modern and soft; works well for image swatches because less of the picture is cropped.
- Square: sharp and structured; a natural match for button-style size options and minimalist themes.
Adjust Swatch Size and Alignment
Three number fields control the footprint of your swatches:
- Width (px) and Height (px): the default is 36, and the plugin recommends 32 to 48 pixels.
- Gap between swatches (px): the default is 8.
Choose larger values for image swatches (so detail is visible) and for stores with a lot of mobile traffic (so fingers can tap accurately). For alignment, swatches follow your theme’s variation layout, so if you need left, center or right alignment beyond what your theme offers, add a small rule in the Custom CSS box under Settings → Advanced.
Customize Borders and Background Colors
The same tab lets you set the colors that signal state:
- Selected Border Color (default dark gray) marks the chosen swatch.
- Hover Border Color (default blue) responds to the mouse.
- Button Background and Button Text Color style unselected label swatches.
- Button Selected Background and Button Selected Text style the chosen label swatch.
Accessibility check: make sure the selected state stands out from the unselected one. The W3C’s guidance on non-text contrast (WCAG 1.4.11) recommends at least a 3:1 contrast ratio for interface components, which is a good target for borders around pale swatches such as white or cream.
Enable Variation Tooltips
Tooltips show the term name when a shopper hovers over or focuses a swatch. They are especially important for pure color circles, where “Sage” or “Burgundy” is more useful than a guess. In Settings → Tooltip, switch on Enable Tooltips, then pick the Tooltip Text Color and Tooltip Background. In Settings → Availability you can also turn on Show Stock Count in Tooltip to create a little urgency.
On the product page, the Variations tab adds two more helpful switches: Show Attribute Name and Show Selected Value (so the label reads “Color: Red” after a click). Turn on Hide Original Dropdown so shoppers never see both controls.
6. How to Display Variation Swatches on Shop and Category Pages
Product pages are only half the story. When swatches also appear on your shop, category, tag and search pages, shoppers can see available colors and sizes from the grid and even add a variation to the cart without opening the product. Open Variation Swatches → Settings → Shop / Archive.
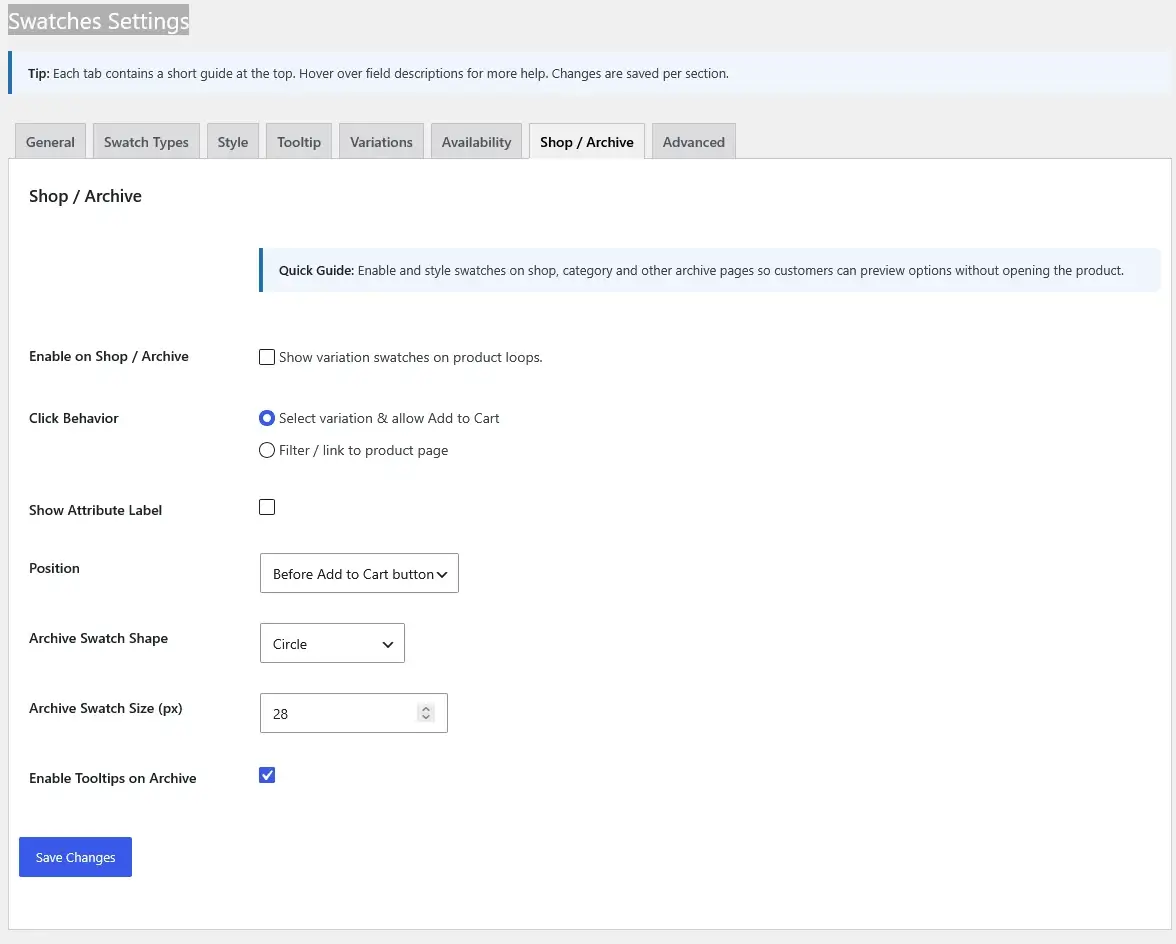
- Tick Enable on Shop / Archive (it is off by default).
- Choose Click Behavior: Select variation & allow Add to Cart lets shoppers pick and buy from the grid, while Filter / link to product page sends them to the product.
- Decide whether to Show Attribute Label above each swatch row.
- Pick the Position: before or after the Add to Cart button, after the product title, or after the price.
- Choose an Archive Swatch Shape and Archive Swatch Size (the default is 28 px, smaller than on the product page so grids stay tidy).
- Keep Enable Tooltips on Archive ticked, then click Save Changes.
Reload your shop page and every variable product with swatch attributes now shows its options. The aThemeArt documentation on swatches on shop and archive pages has additional notes if your theme uses a custom product loop.
Design tip: grids look best when each card shows no more than two or three swatch rows. If a product has many attributes, keep the most decision-driving ones (usually color and size) visible on the grid.
7. How to Show Additional Product Images for Each Variation
Swatches tell shoppers what exists; photos prove it. When someone clicks the red swatch, they expect the product photo to turn red. WooCommerce supports this natively through variation images, and swatches make the interaction feel instant.
To set a variation image:
- Edit the variable product and open the Variations tab.
- Expand a variation (for example, Color: Red) by clicking its row.
- Click the small image placeholder on the left and choose or upload the photo for that variation.
- Repeat for every color, then click Save changes and Update.
Now when a shopper clicks a swatch, WooCommerce swaps the main image for the matching variation photo. A few best practices:
- Shoot every variation with the same angle, background and aspect ratio so the swap does not make the page jump.
- Name files descriptively (for example,
blue-backpack-front.webp) and write real alt text for each variation photo. Google’s guide to image SEO best practices covers file names, alt text and responsive images. - Compress images and serve modern formats like WebP so image swaps feel instant.
Heads up: core WooCommerce attaches one image to each variation. If you want a full gallery of extra photos for every color, you will need a dedicated variation gallery add-on alongside your swatches plugin. The two work together because swatches only change the selection, not the gallery logic.
8. How to Filter WooCommerce Products by Color, Size, and Attributes
Big catalogs need filters. With the PRO plugin, you can add a sidebar widget that lets visitors filter your shop by color swatch, image swatch or label, using the same visual style as your product pages.
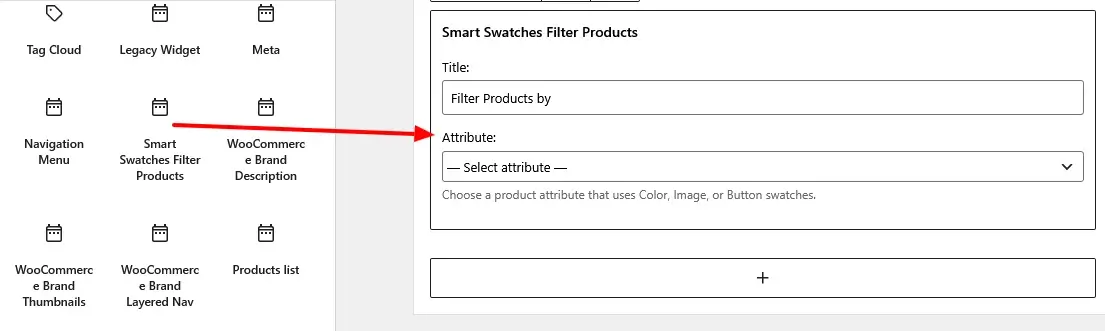
- Go to Appearance → Widgets (or the Site Editor if you use a block theme with a sidebar).
- In your shop sidebar, click + and search for Smart Swatches Filter Products.
- Add the widget, then type a Title such as “Filter Products by Color”.
- Under Attribute, pick an attribute that uses Color, Image or Button swatches.
- Click Update. Add another copy of the widget for each additional attribute, like Brand or Size.
The result is a visual filter panel. Visitors click a color circle or a brand logo and the product grid narrows instantly:
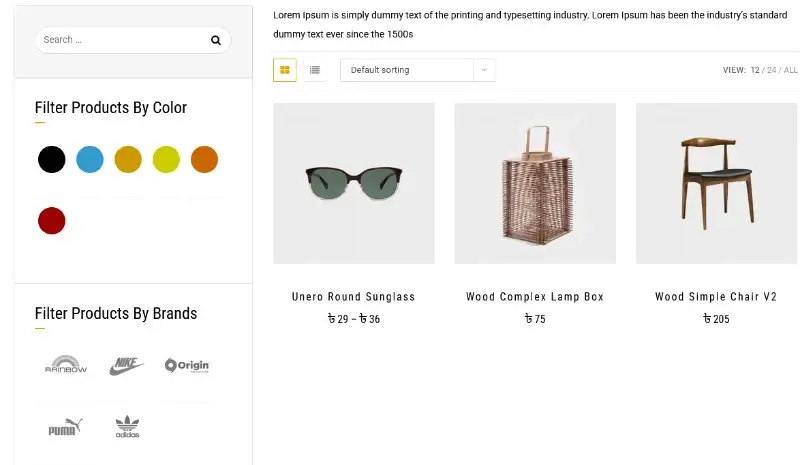
Filtering relies on global attributes, which is one more reason to prefer them over custom attributes. If you want to compare filtering approaches, plugins and layouts, our guide to WooCommerce product filters goes deeper.
9. Common WooCommerce Variation Swatch Problems and How to Fix Them
If something looks off, work through this checklist from top to bottom. It solves the large majority of “my swatches are not showing” questions.
| Problem | Likely cause | Fix |
|---|---|---|
| Still seeing dropdowns | The attribute Type is still “Select (Dropdown)” | Products → Attributes → edit the attribute and choose Color, Image or Button / Label |
| Swatches missing on one product | Attribute not marked “Used for variations”, or variations not saved | Tick the box, save attributes, regenerate variations and update |
| Option does not appear on the storefront | The variation has no price | Open the Variations tab and set a price for every variation |
| Swatches missing everywhere | The global switch is off (or, on phones only, “Disable Swatches on Mobile” is on) | Settings → General: turn on Enable Swatches Globally; check Settings → Advanced |
| Both swatches and a dropdown show | Original select is still visible | Settings → Variations: enable Hide Original Dropdown |
| No swatches on shop pages | Archive display is off by default | Settings → Shop / Archive: tick Enable on Shop / Archive |
| No tooltips | Tooltips disabled | Settings → Tooltip (and Shop / Archive for loops) |
| Price does not update when selecting | Your theme uses a different price element | Settings → General: change the Price Update Selector to your theme’s price class |
| Old settings still show | Page, plugin or CDN cache | Clear your caching plugin and browser cache |
| Layout looks broken | Theme or another swatches plugin overriding the form | Deactivate other swatch plugins, test with a default theme, then contact support |
If a price shows in the wrong place after a variation is selected, you may also want to move the WooCommerce variation price to a position that suits your layout.
10. Best Practices for Using Product Variation Swatches
Good swatches are easy to build and easy to get slightly wrong. Keep these habits in mind:
Do
- Use color swatches only for true colors, and image swatches for patterns, textures or logos.
- Keep swatches between 32 and 48 pixels so they are tappable on phones.
- Turn tooltips on so every swatch has a readable name.
- Show the selected value (“Color: Red”) so shoppers know what they picked.
- Show out-of-stock options crossed out or faded, and set a price on every variation.
- Use the same photo angle for every variation image.
Don’t
- Use ten similar shades with no labels or tooltips.
- Rely on color alone to show the selected state; add a clear border.
- Upload huge, unoptimized swatch images.
- Mix circles, squares and rounded shapes randomly across attributes.
- Create custom attributes for options that many products share. Use a global attribute instead.
- Run two swatch plugins at the same time.
A quick pre-launch checklist
- Every swatch attribute has the right Type under Products → Attributes.
- Every term has a color or image.
- Every variation has a price and, if relevant, a stock status.
- Tooltips and the selected value are visible.
- The product page and the shop page both show swatches.
- You tested a swatch click, add to cart and checkout on a phone.
- Out-of-stock terms look clearly unavailable.
Swatches are also compatible with modern WooCommerce features: the plugin declares support for High-Performance Order Storage (HPOS) and the Cart and Checkout blocks, so you can use them on current stores without extra work.
11. Frequently Asked Questions (FAQs)
How do I add color swatches to WooCommerce products?
Create a global attribute under Products → Attributes and set its Type to Color. Click Configure terms and choose a color for each term (Red, Blue, Green). Then add that attribute to a variable product, tick Used for variations, generate the variations and set prices. The dropdown on the product page becomes clickable color circles.
How do I add image swatches instead of dropdowns?
Create an attribute and set its Type to Image. Under Configure terms, upload a picture for every term using Upload/Add image. Assign the attribute to a variable product as usual. For a single product without a global attribute, use the Custom Swatches tab inside the Product data panel, choose Image, and upload a picture per term.
Can I display variation swatches on shop and category pages?
Yes. In Variation Swatches → Settings → Shop / Archive, tick Enable on Shop / Archive. You can choose the position (for example, before the Add to Cart button), the swatch shape and size, tooltips, and whether a click selects a variation for add to cart or links to the product page.
Can customers see different product images when selecting a color?
Yes. Assign a photo to each variation in the Variations tab. When the shopper clicks a color swatch, WooCommerce switches the main product image to that variation’s photo. If you need several extra gallery images per color, add a variation gallery plugin alongside your swatches.
Do WooCommerce variation swatches work on mobile devices?
Yes. Swatches are tap-friendly and typically easier to use on a phone than a native dropdown. Set the width and height between 32 and 48 pixels for comfortable taps. A setting under Advanced lets you fall back to native dropdowns on small screens, but most stores never need it.
Can I customize the shape and size of product swatches?
Yes. Under Settings → Style you can choose Circle, Square or Rounded Corners, set the width, height and gap in pixels, and customize the selected border, hover border and button colors. Shop and archive swatches have their own shape and size setting.
Do variation swatches affect WooCommerce SEO?
Swatches are a front-end interface, so they do not change your product data or create duplicate pages. They are not a direct ranking factor. They can help indirectly by making products easier to use, which supports engagement and conversions. To protect performance, compress swatch and variation images, use descriptive alt text on product photos, and avoid loading oversized files.
12. Final Thoughts
Adding WooCommerce color and image swatches is one of the quickest upgrades you can make to a variable product page. Create a global attribute, set its type, add a color or image to each term, assign it to a product, and fine-tune the style. That is five steps, no code, and about five minutes. From there you can extend swatches to your shop pages, show variation images and add a swatch filter to your sidebar.
Start with one product, check it on desktop and mobile, then roll the same attributes out across your catalog. Because global attributes are reusable, every product you add afterward gets swatches automatically.
Ready to turn your dropdowns into swatches? Get Smart Variation Swatches for WooCommerce PRO and follow the steps above to launch color, image and button swatches today: